Tuesday, August 21, 2012

I'm doing the Reader Pick at Take-a-Look Tuesday


Mandy at Sugar Bee Crafts hosts a wonderful linky party, Take-A-Look Tuesday.  I have the great privilege of doing her Reader Pick feature for the week.  Boy, are there lots of fabulous projects this week!  I'm featuring a few (yes, 12 is a few when you consider just how many link up to this great party) of my top faves, but I encourage you to check out more.

For the purpose of those of you reading this from Sugar Bee Crafts, I'll say that I'm Carrie from Five Seventeen Repurposing, and I would love for you to come check out my young blog.
I'm a fairly new blogger, so you haven't had much chance to get to know my personality, style, or likes.  But I'm sure you can tell that I like flowers.  I was super excited to see at today's party two posts about multiple flower projects.  So I have to make those my top features.

Check out Henry Happened for 25+ flower projects: making different kinds of flowers and wonderful projects from flowers. 
The pics show giant paper roses and flower lollipops.  Go see all the wonderful ideas!


The Crafty Blog Stalker has scoped out 20 paper flower projects.  Because my heart is for repurposing, I'm posting the pic of the paint chip flower.  I hope you enjoy them all!


Because I'm new at this, I'm still trying to figure out how I want my blog to be.  I know I want to reflect my personality and not just what I think others want it to be.  So when I saw that Iuliana from Hip 2 Thrift is doing 30 Days to Finding your Blogging Voice, I was very excited.  I don't know how often I'll participate in the writing prompts, but I'm looking forward to doing what I can.


Vintage Mellie created patio bliss!  I absolutely love it!  There are so many beautiful pics.  She did a fabulous job of creating this space.  I won't spoil it all here, but I will post two of the awesome pics.


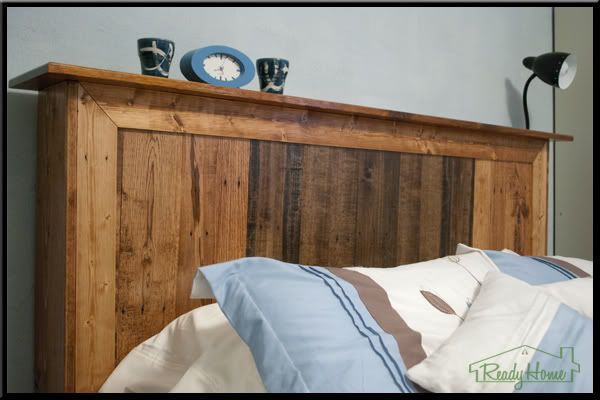
I love pallet projects!  There's a fabulous pallet headboard over at Ready Home for you to check out.  I wouldn't have even guessed that it started out as a pallet.


Going along with my love for repurposing, I have to feature Nici's (from Posed Perfection) "green" package packing idea.  She also showed a great gift wrapping idea.


Did you know you can iron fabric directly to your wall?  I didn't, but The Creek Line House shows us how.  So cool!


I've been seeing several projects with drop cloths, and here's another one from Ashley at Domestic Imperfection.  She used it to recover her bar stools.  Wonderful!


These little birdies by Jill at Made it on Monday are so cute!  She even gives a link to the tutorial and pattern she used.  I'm not much of a sewer, but I think I could do these.

little birdies 8

I found a fabulous idea for embellishing a skirt over at Shop Ruby Jean.  I love the ombre look!


This feature wouldn't be complete without some dessert!

I think peanut butter and chocolate is my favorite dessert combo.  The Farm Girl's Peanut Butter Cup Ice Cream Dessert sounds super yummy!


I'm a brownie girl, and I'm thinking these mallow brownie bars will be made in my kitchen very soon.  Check out the recipe at The Mandatory Mooch.


Well, those are my top twelve faves!  But there's so much more fabulousness over at Take-A-Look Tuesday for you to scope out.  Enjoy!


Friday, August 10, 2012

Embroidery hoop cake/dessert stands


A few weeks ago a rummage sale was coming to a close and the deal was $1 for a bag of wonderfulness.  A number of embroidery hoops made it into my bag, as well as some pink fabric and other goodies that will be used in other projects once inspiration hits.


I went on a Pinterest search and was inspired to make cake/dessert stands by this post from The Sweetest Occasion.

I followed her directions fairly closely.  I did find that I needed to use a craft knife to cut the foam board to get a cleaner cut.  I also hot glued the foam circles to the inside of the hoops to insure that they would be secure.  FYI-I found foam board at the Dollar Tree for a buck a piece.  That's the cheapest I've ever seen it, even when it's on sale at other places.


The vase used for the tallest stand was found in a box of vases on the side of the road.  The jars came via my pantry.


Using the scraps from my fabric, I made confetti to nest my burlap flower and origami butterfly.
My tutorial for the flower is found here.
I used this tutorial to make the butterfly.


I like that these dessert stands can be customized by changing out the fabric and/or the nested items in the jars.


Wednesday, August 8, 2012

Water Bottle Bracelets

I've been working on more project ideas for the women's retreat that I will be helping with in September.  One of the ladies in charge reminded me that the project will need to be simple because the ladies will want to do a lot of talking and will likely not pay attention to a bunch of different steps.  The burlap flowers are fairly simple, but I don't think they're simple enough for my audience.  Plus, they're kind of messy.  Our retreat is at a hotel on Mackinac Island, which means that we need to have something that won't make a mess for the staff to clean up, or worse, for us to be charged a fee for.

My next idea (and one that I'm pretty sure we'll go with) is water bottle bracelets. 


I like these first of all because they are a wonderful repurposing project.  The main things needed for them are a water bottle and repurposed fabric of some sort.  The peach one is from a T-shirt, and the white flowered one is from an old pair of pajama pants.

Secondly, they're simple.  All I did was cut the water bottle and wrap fabric around it, hot gluing a bit along the way.  I used a piece of velcro to make a closure for each bracelet.

Thirdly, many things can be done to embellish them.  With the peach one, I cut out ovals of various sizes and hot glued them on, one on top of the other.  For the flowered bracelet, I used a strip of the PJ fabric to make a rosette and then hot glued it.

And that's that.  I think I have a winner for the retreat.  I plan on showing the ladies in charge this week to get their input.

P.S.  Check out my previous post from ealier today.  A woman in my area is selling a vintage typewriter for $40 or best offer.  If you're interested, let me know, and I'll put you in contact with her.

I'm linking the bracelets here:

Vintage typewriter for sale


This typewriter is being sold by a woman in my area for $40 or best offer.  If you are interested, let me know and I will put you in contact with her. 


Wednesday, August 1, 2012

Burlap Flower Arrangement

Don't be shocked...I bought the burlap.  This isn't a repurposing project.  But I found this cute project and wanted to try it.  I'm in charge of bringing a craft project to my church's women's retreat at the end of September.  The theme is a western one, and I think the burlap fits the theme well.

I found the burlap flower on Fave Crafts.  It's a great site and even sends a newsletter of ideas each day.  I've found lots of great things. 


Click here for how it was made for Fave Crafts.

I tweaked the instructions just a bit.  I used hot glue instead of tacky glue because I didn't want to wait for glue to dry.  If you use hot glue, be aware that it could seep through the burlap and burn you or stick to the surface below.  Using a low temp glue gun helps.

 
I cut a piece of burlap.  I didn't do a specific measurement, but my guess is it's 5 x 10 inches.  Just be aware that the bigger the piece, the larger the flower.  I ran a line of hot glue down each long side about four burlap threads in from the sides.


Beginning at the center, I began pulling the long burlap threads.  I had to be careful not to also pull the short threads.


I folded the burlap in half and glued it.


I began hot gluing a skewer to one end of the burlap piece and rolled it up, gluing as I went.


I fluffed out the ends of the flower to make it look more realistic.  I made three of them.  I think I like it better without a button in the center. 

I think it will be a great project for our women's retreat.  I'm looking forward to it.


I made these tassles from the long burlap threads that I pulled out.  I couldn't bear to just throw them away, so I made these simple tassles by gathering a bunch of threads, folding them in half, and using one thread to tie them together.  I'm thinking they would be great add-ons to wrapped packages.

I'm showing these off at the following parties: